
The first thing to notice is the 8 dots in the top-left corner of a selected Button. This is the Handle Bar. When you hover over it, your mouse will change to an open hand, allowing you to click and drag the button around the Canvas.
Design tab
- Label: The name of the Button displayed in the tree view.
- Layout: Determines the layout of the Button:
- Icon and one line of text (Default).
- Icon with superimposed text.
- Three lines of text where the top line has distinct color properties.
- Three lines of text where the middle line is larger than the others.
- Two lines of text
- Two lines of text two icons and two gauge bars
- Icon: Select an icon from a dropdown or use the search bar. to search the many included Icons
Text Fields
- Context: The top line in layout 3,4 and 5
- Text: The middle line in layout 3,4 and 5 (or the only line in the first 2 layouts).
- Text 2: The bottom line in layout 3,4 and 5
Styling
- Under styling, you can adjust various styling options for the button like:
- Color, Font size, text wrap, text scroll, and blink.
- If any of the options is missing click on the + sign at the top of the styling section and add the option you would like.
Location
Flow: determines button behavior and positioning:
- Float: Positions dynamically, starting from top-left.
- Static: Allows full customization by setting X/Y coordinates (Default).
- Anchor: Automatically positions the button in corners, allowing resizing.
- Fixed: Similar to anchor but unaffected by scrolling.
Action Handling
- Press: Executes when the button is pressed.
- Release: Executes when the button is released.
- Left/Right: Assigns an action to the left rotation and another action to the right rotation on the Stream Deck Studio, Stream Deck Plus and Stream Deck Plus XL
- Encoder: Assigns both left and right rotations to a single Action and the Delta is used to adjust the value of the action on the Stream Deck Studio and Stream Deck Plus.
For example, we’ll use the Press Action Handler:
1. You can search Directly in the + Add Action field, or you can click on the folder at the end to bring up the Action selection dialog box.
Example: Select ME:Set Program Input. The button will set the Atem switchers M/E 1 bus to input Media Player 1.
Action mode
Every Action has the option for different targeting modes.
Single Connection
Which is default and targets the connection you chose when adding the action. In the dropdown you can manually select other connection using the same connection module, there may be differences between devices using the samen module.
Connection Variable
The Position and Section variables have a Connection Variable type which allows you to define the connection target during runtime. The Connection targets need to use the same Connection module, and you can then use the Set Section Variable or Set Position Variable internal actions to change the target for the action.
Multiple Targets:
This mode allows you to target multiple connections simultaneously for example a Main and Backup Video Switcher
there are similar options for the feedbacks except the Multiple targets, as that would deliver results that where less informative but you could use 2 feedbacks with the 3 line Layout. Where one feedback could change Context background color and another feedback could change the Background color.
Action Steps
- Add steps by clicking the + after Step 1. Or you could use the duplicate step button on the step you are on.
- Each step has unique Style and Action dialogs.
- Under the cogwheel you find an option to set auto-progress, each press of the button will then advance to the next step in line.
- There is also an option to use Absolute or relative delays.
- You can rename the steps by double-clicking on the step, this will bring up a dialog box where you can change the name of the step.
Delays can be set to Absolute or Relative:
There is also an option to reorder the steps. This will bring up a dialog box where you can drag the steps in to the position you need.
When clicking on the +Add Action, you are presented with a selection of recently used actions and a option to create a ActionGroup or Actionlogic.
The ActionGroup lets you group different actions together either for Sequential or Concurrent execution
The ActionLogic lets you make Conditional actions or in other words let yo make actions that only executes if certain conditions are met.
For condition, you can use any feedback or use an expression to test a variable for a value.
If the time is between 12:00 and 23:59, pressing the button will set the light to 255 or 100%
If the Time is between 00:00 and 11:59. Pressing the button will set the light to 128 or approx 50%.
This is just a simple example of how you can use ActionLogic, there are many possible uses for conditional logic in execution of actions.
Feedback
There is an option in this dialog box to select multiple, and for this example we will turn that on. We will select the ME:One ME preview source and the ME:one ME Program source.
This will bring two feedbacks into the properties for the button, and we will change the color for the ME:One ME preview feedback to green and leave the Feedback for the ME:one MEProgram as it is. This will turn the button red whenever the Camera 1 is live on the Program bus. And green whenever the Camera 1 is in the Preview bus.
Internal expression Feedback
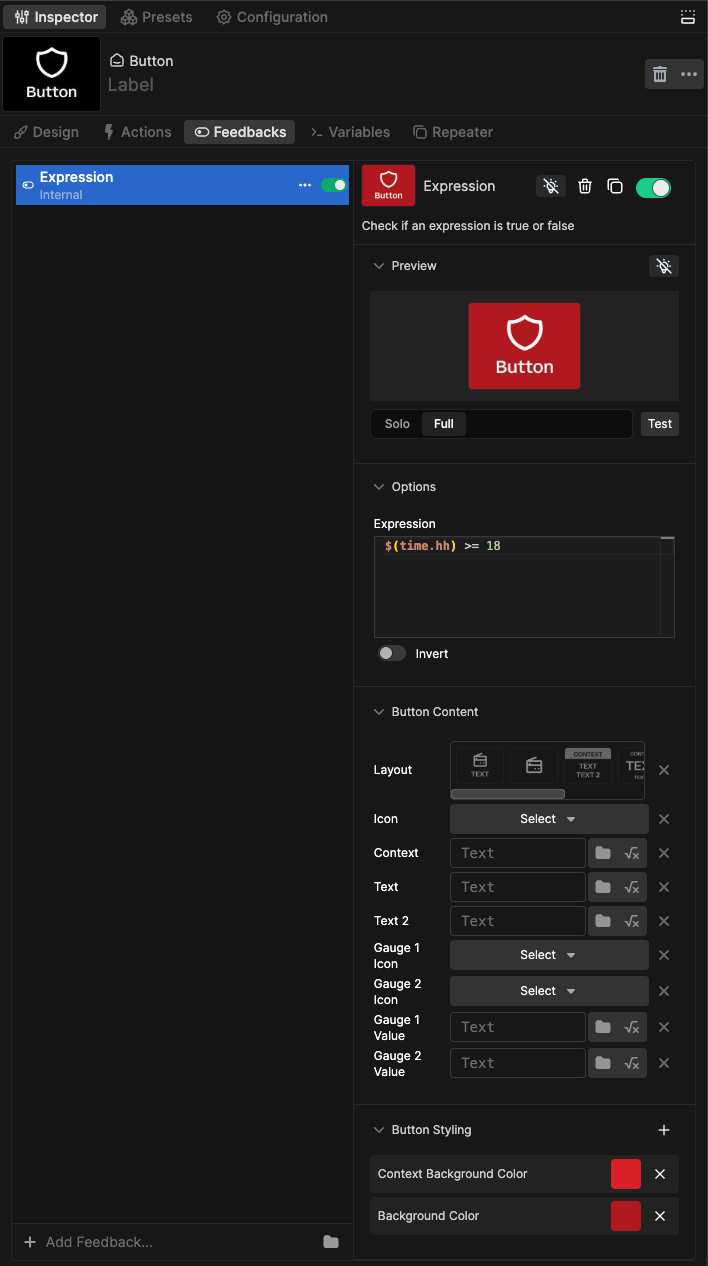
With the Internal Feedback Expression you can test any variable on the system for values, resulting in a true or false state. In the example above we are testing the variable $(time.hh) to see if the hours is greater than or equal to 18 on a 24hrs clock, if the time is 6pm until midnight the equal or grater than >= will be true and the feedback will show the true state. From midnight to 5:59pm the expression will be false and the feedback will show the false state.
Action and Feedback Repeaters
Clicking on the ... menu inside the dropdown box will bring up the repeater options.
If we click on the Create repeater it will automatically create a button for each of the items in the dropdown list.
And we will have 18 buttons made from one single button. The first button will be a master.
So if you change any styling on that button it will change on all the "children"
Now let's enable the Repeater function on the feedbacks as well.
And then we have 18 buttons with feedback for both Program and Preview
To customize a set of repeated buttons there are some repeater options at the bottom of the Inspector.
Clicking on the Customize button will bring up a dialog box.
Clicking on the eye icons for the sources will hide/unhide them.
And just like that with a few clicks we have made a simple controller for an Atem 1me mixer with selected sources and both Program and Preview feedbacks.
Encoder Actions
Encoder actions are intended to be used with surfaces that have encoders on them, like the Stream Deck studio and the Stream Deck Plus but any surface in the same position as a surface with encoders can use an encoder action. We will use a few examples to show how encoders can be used and this will also give examples of expressions and repeater functions.
In the first example we will control 32 DMX lights over ArtNet, we have added the Generic Artnet Connection to our Configuration, and we will use a repeater to make the setup quick and easy.
We will start with 1 button and configure the Encoder action first.
- First we change the Action handlers by turning off Press and Release which are on by default, then we turn on the Encoder Action handler. This will bring up some Encoder specific options in the Action settings.
- Next we will set the Min and Max value for the encoder. We set Min to 0 as we want the lights to be able to turn off, and we set the Max value to 20 this will limit the encoder output to 21 values which is close to a full turn of the encoder. Shown here with the value 10
- Next we will turn on expression mode for the Value option in the Action, note that it says that the legal values are 0-255, so we need to do a bit of math. If we divide 255 by 20 we get 12.75 so to get values between 0 and 255 we have to Multiply the Encoder output by 12.75 hence the need for the expression $(self.encoderValue) * 12.75 Each button will hold its own encoder values in the background so no need to keep track of anything. With that we can already control 1 light with the push of the button and turning the encoder.
- Next we will use the repeater to make the rest of the buttons. But the channel range is not in a dropdown list, so we have to go about it in another way. We scroll down to the bottom of the Inspector and turn on the repeater and type in 32 in the Amount box.
- And with that we now have 32 buttons all controlling Channel 1. So we need a way to distribute Channel 1 to 32 across the buttons. And there is a variable for that to, $(self.repeatIndex). So if we go back to the action and turn on the variable mode for the channel option, and input the variable we have channel 1 to 32 distributed across the 32 buttons.
- Next we want some labels on the buttons. We choose the Gauge style, and turn on expression mode for the text box, and enter $(self.encoderValue)*5 this expression will give us values from 0-100 which may make more sense for the user. In the Context text box we browse for the variable $(self.repeatIndex). And then we have 2 labels one with a calculated value for the light level and one with the channel number.
- Now let's change the Icon to a Bulb, and lastly let's use the Gauge 1 Value to reflect the level of the light, we will do this with an expression. However, we have to modify this a bit. A 0 value will show an empty gauge and 1 will fill it, so we need to do some more math, and we will use the expression ($(self.encoderValue)*5)/100. First we multiply the encoder value (0-20) by 5 to make it (0-100) and then we divide that with 100 to be 21 values between 0 and 1.
This will now give you 32 buttons, each controlling its own channel of ArtNet Light control. To assign the encoder to any of the 32 buttons, you simply press the button which then will highlight the button, and you can turn the encoder to adjust the light level. You can then either press the button again to release it, or you can press the encoder, which also releases the encoder, or you can select another button, which will assign the encoder to the new button.
There are also a few settings which controls the encoder behavior.
Encoder Options
Assignments
- Click Select: which is the default and the method we just used, where you push a button to assign all the unassigned encoders in the position to that button.
- Auto: which auto assigns any encoder action to the closest encoder. This only work if your encoder actions match the number of encoders you have and are perfect for the Stream Deck Plus where you can put the encoder Action buttons on the touch screen above the Encoders, and they will Auto assign to the closest Encoder.
- Enc 1-16: which will force assign an encoder action to a specific encoder in the position.
Display
- Single: which is the default, and will light up 1 Led for each step between the Min and the Max value.
- Start: which will light up and keep on, 1 Led for each step between the Min and Max value.
- Split: which will mimic a pan or balance indicator, with a Left, Center, Right indication.
- End: which is the opposite of Start, and will start up with all Leds on, and they will turn off as you turn the encoder from the min to the Max values.
Active Style
- Ignore: which will not show any change on the button that is assigned to an encoder.
- Highlight: which is the default, and will show a white outline on the button that is assigned to an encoder.
- Value on white background: which will show the encoder value and the Text value in black on a white background.
Encoder Selector
As we can see the Fader level has preset values in a dropdown list.
And there is a ... menu at the end of the dropdown selector.
We will select that, and select Create encoder selector, and just like that we have now assigned an encoder to select between the different levels in the dropdown list.
There is also a couple of variables associated with the encoder selector.
The $(self.encoderSelectorValue) holds the actual value, and in this case it's a decimal number between 0 and 1, which was also what we used for the Gauge value in the previous example, but here we don't need to do any math, as the number is available to us. What the actual content of this variable is will depend on the connection but you can put it in to a text field and use it as a label to see what the content is and whether it will be useful for you.
So we will use the $(self.encoderSelectorValue) variable in the Gauge1 Value field, giving the Gauge the logarithmic feel of the actual values sent to the mixer.
Nested variabel
There is a little "secret" with the $(self.repeatIndex) variable, and that it that it can be nested into other variables, with the help of the % symbol as a substitution. it's described in the variable browser
The XR12 has a lot of variables for each channel including one for the Channel Name $(xr12.l_ch1) as we can see the the variable contains a reference to the specific channel _ch1 we can exchange that number with the repeat index making the variable $(xr12.l_ch%) to use the variable nesting of the repeatIndex we need the txt field to be in Expression mode
Testing Buttons